
คุณเคยรู้สึกว่า Prompt ของคุณยังไม่ดีพอ หรือไม่ได้คำตอบที่ต้องการจาก AI ไหม? ไม่ต้องกังวลอีกต่อไป! วันนี้เรามี 25 คำสั่งพิเศษ (Special Commands) ที่จะช่วยให้ Prompt ของคุณทรงพลังขึ้นอย่างก้าวกระโดด ใช้ได้กับทั้ง ChatGPT, Claude และ Bard! มาดูกันว่ามีอะไรบ้าง
ทำไมต้องใช้คำสั่งพิเศษ?
- ได้คำตอบที่ตรงจุดมากขึ้น
- ควบคุมรูปแบบและเนื้อหาของคำตอบได้
- ประหยัดเวลาในการถามคำถามเพิ่มเติม
- เพิ่มความคิดสร้างสรรค์ในการใช้ AI
ท่านสามารถเลือกใช้งานAIจากค่ายไหนก็ได้ครับ
| คุณสมบัติ | ChatGPT | Microsoft Copilot | Claude | Gemini | Perplexity |
|---|---|---|---|---|---|
| ผู้พัฒนา | OpenAI | Microsoft | Anthropic | Perplexity AI | |
| โมเดลพื้นฐาน | GPT-3.5/GPT-4 | GPT-4 | Claude | PaLM 2/Gemini | GPT-3.5/GPT-4 |
| การรองรับภาษา | หลายภาษา | หลายภาษา | หลายภาษา | หลายภาษา | หลายภาษา |
| ความสามารถในการประมวลผลภาพ | มี (GPT-4) | มี | มี | มี | มี |
| การเข้าถึงข้อมูลเรียลไทม์ | ไม่มี | มี | ไม่มี | มี | มี |
| ความสามารถในการเขียนโค้ด | ดี | ดีมาก | ดีมาก | ดี | ดี |
| การใช้งานฟรี | มีแบบจำกัด | มี | มีแบบจำกัด | มี | มี |
| แพลตฟอร์มที่รองรับ | เว็บ, มือถือ | Windows, Edge | เว็บ, API | เว็บ, มือถือ, API | เว็บ, มือถือ |
| ความสามารถในการสร้างเนื้อหา | ดีมาก | ดีมาก | ดีมาก | ดีมาก | ดี |
| การอ้างอิงแหล่งข้อมูล | ไม่มี | มี | ไม่มี | มี | มี |
ใช้งานChatGPT https://chatgpt.com/
ใช้งาน microsoft Copilot https://copilot.microsoft.com/
ใช้งาน Gemini https://gemini.google.com/app
ใช้งาน perplexity https://www.perplexity.ai/


10 คำสั่งพิเศษยอดนิยมที่คุณต้องรู้!
- [Act as]: ให้ AI สวมบทบาทเฉพาะ
วิธีใช้: เริ่ม Prompt ด้วย “[Act as ตามด้วยบทบาท]” เช่น “[Act as a marketing expert]”
คำอธิบาย: ช่วยให้ AI ตอบในมุมมองของผู้เชี่ยวชาญในด้านนั้นๆ - [Context]: ให้บริบทเพิ่มเติมแก่ AI
วิธีใช้: เขียน “[Context: รายละเอียดบริบท]” ก่อนคำถามหลัก
คำอธิบาย: ช่วยให้ AI เข้าใจสถานการณ์หรือข้อมูลพื้นหลังได้ดีขึ้น - [Format]: กำหนดรูปแบบการตอบ
วิธีใช้: ระบุ “[Format: รูปแบบที่ต้องการ]” เช่น “[Format: bullet points]”
คำอธิบาย: ทำให้ได้คำตอบในรูปแบบที่ต้องการ เช่น รายการ, ตาราง, หรือความเรียง - [Constraints]: กำหนดข้อจำกัดในการตอบ
วิธีใช้: เขียน “[Constraints: ข้อจำกัด]” เช่น “[Constraints: 100 words max]”
คำอธิบาย: ช่วยควบคุมความยาวหรือขอบเขตของคำตอบ - [Tone]: กำหนดโทนเสียงของการตอบ
วิธีใช้: ระบุ “[Tone: ลักษณะโทนเสียง]” เช่น “[Tone: professional]”
คำอธิบาย: ปรับโทนเสียงของคำตอบให้เหมาะกับกลุ่มเป้าหมายหรือวัตถุประสงค์ - [Audience]: ระบุกลุ่มเป้าหมาย
วิธีใช้: เขียน “[Audience: กลุ่มเป้าหมาย]” เช่น “[Audience: beginners]”
คำอธิบาย: ช่วยให้ AI ปรับระดับภาษาและเนื้อหาให้เหมาะกับผู้อ่าน - [Examples]: ขอตัวอย่างประกอบ
วิธีใช้: เพิ่ม “[Examples: จำนวนตัวอย่าง]” เช่น “[Examples: 3]”
คำอธิบาย: ทำให้ได้ตัวอย่างที่ช่วยอธิบายแนวคิดหรือคำตอบได้ชัดเจนขึ้น - [Step-by-step]: ขอคำอธิบายเป็นขั้นตอน
วิธีใช้: เพิ่ม “[Step-by-step]” ในคำถาม
คำอธิบาย: ได้คำตอบที่แบ่งเป็นขั้นตอนชัดเจน ง่ายต่อการทำความเข้าใจ - [Pros and Cons]: ขอข้อดีและข้อเสีย
วิธีใช้: เพิ่ม “[Pros and Cons]” ในคำถาม
คำอธิบาย: ได้การวิเคราะห์ที่ครอบคลุมทั้งด้านบวกและด้านลบ - [Analogies]: ขอการเปรียบเทียบหรืออุปมาอุปไมย
วิธีใช้: เพิ่ม “[Analogies]” ในคำถาม
คำอธิบาย: ช่วยอธิบายแนวคิดที่ซับซ้อนด้วยการเปรียบเทียบกับสิ่งที่คุ้นเคย

ผมได้ไปเจอคลิปนี้ มีการแจกระบบเทรดของลุงโฉลก ซึ่งเป็น CDC ActionZone ก็เลยเอาไปปรับแต่งเพิ่มนิดๆหน่อยๆ ให้ทำการเปิดสัญญาณซื้อขาย กับเพิ่มสัญลักษณ์การใช้งานให้ง่ายขึ้น

1.เปิดบัญชีทดลอง
ทดลองเทรด Binaryoption (เหมาะก็ต่อเมื่อเปิดดูสัญญาณ TF 1H ขึ้นไป) ฝึกฝนเทรดฟรีคลิกที่นี่
ทดลองเทรดForex (ใช้ได้ดีกับสัญญาณนี้) ฝึกฝนเทรดฟรีคลิกที่นี่
2.ไปที่ https://www.tradingview.com/ แล้วเอาCodeที่ผมแจก ก็อปวางได้เลยครับ
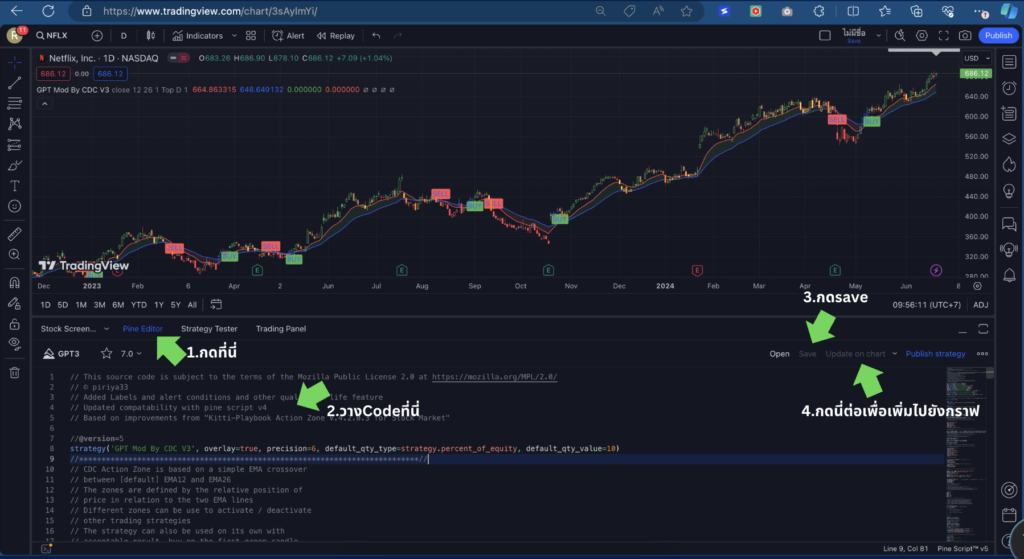
// This source code is subject to the terms of the Mozilla Public License 2.0 at https://mozilla.org/MPL/2.0/
// © piriya33
// Added Labels and alert conditions and other quality of life feature
// Updated compatability with pine script v4
// Based on improvements from "Kitti-Playbook Action Zone V.4.2.0.3 for Stock Market"

//@version=5
strategy('GPT Mod By CDC V3', overlay=true, precision=6, default_qty_type=strategy.percent_of_equity, default_qty_value=10)
//****************************************************************************//
// CDC Action Zone is based on a simple EMA crossover
// between [default] EMA12 and EMA26
// The zones are defined by the relative position of
// price in relation to the two EMA lines
// Different zones can be use to activate / deactivate
// other trading strategies
// The strategy can also be used on its own with
// acceptable result, buy on the first green candle
// and sell on the first red candle
//****************************************************************************//
//****************************************************************************//
// Define User Input Variables

xsrc = input.source(title='Source Data', defval=close)
xprd1 = input.int(title='Fast EMA period', defval=12)
xprd2 = input.int(title='Slow EMA period', defval=26)
xsmooth = input.int(title='Smoothing period (1 = no smoothing)', defval=1)
fillSW = input.bool(title='Paint Bar Colors', defval=true)
fastSW = input.bool(title='Show fast moving average line', defval=true)
slowSW = input.bool(title='Show slow moving average line', defval=true)
labelSwitch = input.bool(title='Turn on assistive text', defval=true)
plotSigsw = input.bool(title='Plot Buy/Sell Signals? ', defval=true)
plotRibsw = input.bool(title='Plot Buy/Sell Ribbon', defval=false)
plotRibbonPos = input.string(title='Ribbon Position', options=['Top', 'Bottom'], defval='Top')

xfixtf = input.bool(title='** Use Fixed time frame Mode (advanced) **', defval=false)
xtf = input.timeframe(title='** Fix chart to which time frame ? **)', defval='D')

plotSig2sw = input.bool(title='Plot momentum based Buy/Sell Signals? ', defval=false)
plotSig2lv = input.int(title='Set signal threshold (higher = stricter)', defval=1, minval=0, maxval=1)

//****************************************************************************//
//Calculate Indicators

f_secureSecurity(_symbol, _res, _src) => request.security(_symbol, _res, _src[1], lookahead = barmerge.lookahead_on) // Using f_secureSecurity to avoid repainting

xPrice = ta.ema(xsrc, xsmooth)


FastMA = xfixtf ?
 ta.ema(f_secureSecurity(syminfo.tickerid, xtf, ta.ema(xsrc, xprd1)), xsmooth)
 :
 ta.ema(xPrice, xprd1)


SlowMA = xfixtf ?
 ta.ema(f_secureSecurity(syminfo.tickerid, xtf, ta.ema(xsrc, xprd2)), xsmooth)
 :
 ta.ema(xPrice, xprd2)

Bull = FastMA > SlowMA
Bear = FastMA < SlowMA

//****************************************************************************//
// Define Color Zones

Green = Bull and xPrice > FastMA  // Buy
Blue = Bear and xPrice > FastMA and xPrice > SlowMA  //Pre Buy 2
LBlue = Bear and xPrice > FastMA and xPrice < SlowMA  //Pre Buy 1

Red = Bear and xPrice < FastMA  // Sell
Orange = Bull and xPrice < FastMA and xPrice < SlowMA  // Pre Sell 2
Yellow = Bull and xPrice < FastMA and xPrice > SlowMA  // Pre Sell 1

//****************************************************************************//
// Display color on chart


bColor = Green ? color.green :
 Blue ? color.blue :
 LBlue ? color.aqua :
 Red ? color.red :
 Orange ? color.orange :
 Yellow ? color.yellow :
 color.black
barcolor(color=fillSW ? bColor : na)

//****************************************************************************//
// Display MA lines

FastL = plot(fastSW ? FastMA : na, 'Fast EMA', color=color.new(color.red, 0), style = xfixtf ? plot.style_stepline : plot.style_line)
SlowL = plot(slowSW ? SlowMA : na, 'Slow EMA', color=color.new(color.blue, 0), style = xfixtf ? plot.style_stepline : plot.style_line)
fillcolor = Bull ? color.new(color.green,90) : Bear ? color.new(color.red,90) : color.new(color.black,90) // fillcolor = Bull ? color.green : Bear ? color.red : color.black
fill(FastL, SlowL, fillcolor) // fill(FastL, SlowL, fillcolor, transp=90)

//****************************************************************************//
// Define Buy and Sell condition
// This is only for thebasic usage of CDC Actionzone (EMA Crossover)
// ie. Buy on first green bar and sell on first red bar

buycond = Green and Green[1] == 0
sellcond = Red and Red[1] == 0

bullish = ta.barssince(buycond) < ta.barssince(sellcond)
bearish = ta.barssince(sellcond) < ta.barssince(buycond)

buy = bearish[1] and buycond
sell = bullish[1] and sellcond

bColor_BullBear = bullish ? color.green : bearish ? color.red : color.black

//****************************************************************************//
// Plot Buy and Sell point on chart

plotshape(plotSigsw ? buy : na,
 style=shape.labelup,
 title='Buy Signal',
 location=location.belowbar,
 color=color.new(color.green, 0),
 text="BUY")
plotshape(plotSigsw ? sell : na,
 style=shape.labeldown,
 title='Sell Signal',
 location=location.abovebar,
 color=color.new(color.red, 0),
 text="SELL")

// Display Buy/Sell Ribbon


plotshape(plotRibsw ? plotRibbonPos == 'Top' ? close : na : na,
 style=shape.square,
 title='Buy/Sell Ribbon',
 location=location.top,
 color=bColor_BullBear)

plotshape(plotRibsw ? plotRibbonPos == 'Bottom' ? close : na : na,
 style=shape.square,
 title='Buy/Sell Ribbon',
 location=location.bottom,
 color=bColor_BullBear)


//****************************************************************************//
// Label

labelstyle = close > SlowMA ? label.style_label_down : label.style_label_up
labelyloc = close > SlowMA ? yloc.abovebar : yloc.belowbar
labeltcolor = buy ? color.black :
 sell ? color.white :
 close > close[1] ? color.green :
 color.red
labelbgcolor = buy ? color.green : sell ? color.red : color.silver
labeltext = buy ? 'BUY next bar\n' : sell ? 'SELL next bar\n' : ' '
trendText = bullish ? 'bullish' : bearish ? 'bearish' : 'sideways'


l1 = label.new(bar_index, na,
 text=labeltext + syminfo.ticker + ' ' + str.tostring(close) + ' ' + syminfo.currency + '\n currently in a ' + trendText + ' trend \n',
 color=labelbgcolor,
 textcolor=labeltcolor,
 yloc=labelyloc,
 style=labelstyle)

label.delete(labelSwitch ? l1[1] : l1)

// Momentum Signal using StochRSI

// Adds a momentum based signal following trends to the script
// Default is hidden, only use with caution
// Parameters for STOCH RSI is hard-coded to avoid cluttering the input screen further
// If you need to change anything, make a copy of the code and change it.
// Inputs are commented out, to enable them comment out the hard coded variables first!

// fixed inputs //

smoothK = 3
smoothD = 3
RSIlen = 14
STOlen = 14
SRsrc = close
OSlevel = 30
OBlevel = 70

// User inputs // // COMMENT ABOVE VARIABLES FIRST!!

// smoothK = input(3,"StochRSI smooth K",type=input.integer,minval=1)
// smoothD = input(3,"StochRSI smooth D",type=input.integer,minval=1)
// RSIlen = input(14,"RSI length",type=input.integer,minval=1)
// STOlen = input(14,"Stochastic length",type=input.integer,minval=1)
// SRsrc = input(close,"Source for StochasticRSI",type=input.source)
// OSlevel = input(30,"Oversold Threshold",type=input.float,minval=0.00)
// OBlevel = input(70,"Oversold Threshold",type=input.float,minval=0.00)

// calculations //
rsi1 = ta.rsi(SRsrc, RSIlen)
k = ta.sma(ta.stoch(rsi1, rsi1, rsi1, STOlen), smoothK)
d = ta.sma(k, smoothD)

// storsiBuySig =  if bullish
//     if (d < OSlevel and crossover(k,d))
//         3
//     else if crossover(k,OSlevel)
//         2
//     else if d > OSlevel and crossover(k,d)
//         1
//     else
//         0
// else
//     0

crossover_1 = ta.crossover(k, d)
crossover_2 = ta.crossover(k, d)
iff_1 = d > OSlevel and crossover_2 ?
 1 : 0
iff_2 = d < OSlevel and crossover_1 ?
 2 : iff_1
storsiBuySig = bullish ? iff_2 : 0

crossunder_1 = ta.crossunder(k, d)
crossunder_2 = ta.crossunder(k, d)
iff_3 = d < OBlevel and crossunder_2 ?
 1 : 0
iff_4 = d > OBlevel and crossunder_1 ?
 2 : iff_3
storsiSellSig = bearish ? iff_4 : 0

plotshape(plotSig2sw ? storsiBuySig > plotSig2lv ? storsiBuySig : na : na,
 'Buy more signals', style=shape.triangleup,
  location=location.belowbar, color=color.new(color.teal, 0))
plotshape(plotSig2sw ? storsiSellSig > plotSig2lv ? storsiSellSig : na : na,
 'Sell more signals', style=shape.triangledown,
  location=location.abovebar, color=color.new(color.orange, 0))


//****************************************************************************//
// Alert conditions

alertcondition(buy,
 title='*Buy Alert',
 message='Buy {{exchange}}:{{ticker}}')

alertcondition(sell,
 title='*Sell Alert',
 message='Sell {{exchange}}:{{ticker}}')

alertcondition(bullish,
 title='is Bullish')

alertcondition(bearish,
 title='is Bearish')

alertcondition(Green,
 title='is Green')

alertcondition(Blue,
 title='is Blue (Strong Rally)')

alertcondition(LBlue,
 title='is Light Blue (Rally)')

alertcondition(Red,
 title='is Red')

alertcondition(Orange,
 title='is Orange (Strong Dip)')

alertcondition(Yellow,
 title='is Yellow (Dip)')


//****************************************************************************//

// Entry and Exit Strategy
if (buy)
    strategy.entry("Buy", strategy.long)

if (sell)
strategy.close("Buy")- [ELI5]: อธิบายแบบง่ายๆ
วิธีใช้: เพิ่ม “[ELI5]” (Explain Like I’m 5) ในคำถาม
คำอธิบาย: ได้คำอธิบายที่เข้าใจง่าย เหมือนอธิบายให้เด็ก 5 ขวบฟัง - [Latest info]: ขอข้อมูลล่าสุด
วิธีใช้: เพิ่ม “[Latest info as of DATE]” เช่น “[Latest info as of 2023]”
คำอธิบาย: ระบุให้ AI พยายามให้ข้อมูลที่ทันสมัยที่สุดเท่าที่จะทำได้ - [Fact check]: ขอการตรวจสอบข้อเท็จจริง
วิธีใช้: เพิ่ม “[Fact check]” ตามด้วยข้อความที่ต้องการตรวจสอบ
คำอธิบาย: AI จะพยายามตรวจสอบและให้ข้อมูลเกี่ยวกับความถูกต้องของข้อความ - [Summarize]: ขอสรุปย่อ
วิธีใช้: เริ่มต้นด้วย “[Summarize: ความยาวที่ต้องการ]” เช่น “[Summarize: 3 sentences]”
คำอธิบาย: ได้บทสรุปที่กระชับตามความยาวที่กำหนด - [Expand]: ขอขยายความ
วิธีใช้: เพิ่ม “[Expand]” ตามด้วยหัวข้อหรือแนวคิดที่ต้องการให้ขยายความ
คำอธิบาย: ได้คำอธิบายที่ละเอียดและลึกซึ้งมากขึ้น - [Critique]: ขอการวิจารณ์หรือวิเคราะห์
วิธีใช้: เพิ่ม “[Critique]” ตามด้วยสิ่งที่ต้องการให้วิจารณ์
คำอธิบาย: ได้มุมมองเชิงวิเคราะห์และการประเมินอย่างมีเหตุผล - [Compare]: ขอการเปรียบเทียบ
วิธีใช้: เขียน “[Compare: สิ่งที่ต้องการเปรียบเทียบ]” เช่น “[Compare: iOS vs Android]”
คำอธิบาย: ได้การเปรียบเทียบที่ครอบคลุมระหว่างสองสิ่งหรือมากกว่า - [Brainstorm]: ขอการระดมความคิด
วิธีใช้: เริ่มต้นด้วย “[Brainstorm: จำนวนไอเดีย]” เช่น “[Brainstorm: 10 ideas for…]”
คำอธิบาย: ได้รายการไอเดียที่หลากหลายตามจำนวนที่ระบุ - [Role play]: ขอให้ AI สวมบทบาทในการสนทนา
วิธีใช้: เขียน “[Role play: บทบาท1, บทบาท2]” เช่น “[Role play: job interviewer, job seeker]”
คำอธิบาย: AI จะสร้างบทสนทนาระหว่างบทบาทที่กำหนด - [Perspective]: ขอมุมมองเฉพาะ
วิธีใช้: เพิ่ม “[Perspective: มุมมองที่ต้องการ]” เช่น “[Perspective: environmental]”
คำอธิบาย: ได้คำตอบที่มุ่งเน้นจากมุมมองเฉพาะที่ระบุ - [Counterargument]: ขอข้อโต้แย้ง
วิธีใช้: เพิ่ม “[Counterargument]” หลังจากแสดงความคิดเห็นหรือข้อเสนอ
คำอธิบาย: AI จะนำเสนอมุมมองหรือเหตุผลที่ขัดแย้งกับข้อความเดิม - [Timeline]: ขอลำดับเหตุการณ์
วิธีใช้: เพิ่ม “[Timeline]” ตามด้วยหัวข้อหรือเหตุการณ์ที่ต้องการ
คำอธิบาย: ได้ลำดับเหตุการณ์ที่เรียงตามเวลา - [Case study]: ขอกรณีศึกษา
วิธีใช้: เขียน “[Case study: หัวข้อ]” เช่น “[Case study: successful rebranding]”
คำอธิบาย: ได้ตัวอย่างกรณีศึกษาที่เกี่ยวข้องกับหัวข้อที่ระบุ - [SWOT]: ขอการวิเคราะห์ SWOT
วิธีใช้: เพิ่ม “[SWOT analysis]” ตามด้วยชื่อองค์กรหรือผลิตภัณฑ์
คำอธิบาย: ได้การวิเคราะห์จุดแข็ง จุดอ่อน โอกาส และอุปสรรค - [Ethical considerations]: ขอการพิจารณาด้านจริยธรรม
วิธีใช้: เพิ่ม “[Ethical considerations]” ในคำถามหรือสถานการณ์
คำอธิบาย: AI จะพิจารณาและนำเสนอประเด็นด้านจริยธรรมที่เกี่ยวข้อง
เทคนิคการใช้คำสั่งพิเศษให้เกิดประสิทธิภาพสูงสุด
- ผสมผสานหลายคำสั่ง: ใช้หลายคำสั่งร่วมกันเพื่อให้ได้คำตอบที่สมบูรณ์ยิ่งขึ้น
ตัวอย่าง: “[Act as a financial advisor][Format: bullet points][Audience: college students] ให้คำแนะนำ 5 ข้อในการวางแผนการเงิน” - เริ่มจากกว้างไปแคบ: ใช้คำสั่งทั่วไปก่อน แล้วค่อยๆ เจาะจงด้วยคำสั่งเฉพาะ
ตัวอย่าง: - “[Brainstorm: 10 ideas for a startup]”
- “[Critique] ไอเดียที่ 3 จากรายการข้างต้น”
- “[Expand] วิธีการทำให้ไอเดียนี้เป็นจริง”
- ใช้คำสั่งเพื่อกระตุ้นความคิดสร้างสรรค์:
ตัวอย่าง: “[Analogies] เปรียบเทียบการเรียนรู้ AI กับสิ่งที่คุ้นเคยในชีวิตประจำวัน” - ขอมุมมองที่หลากหลาย:
ตัวอย่าง: “[Perspective: environmental] วิเคราะห์ผลกระทบของรถยนต์ไฟฟ้า” - ใช้คำสั่งเพื่อการวิเคราะห์เชิงลึก:
ตัวอย่าง: “[SWOT analysis] วิเคราะห์ธุรกิจ e-commerce ในประเทศไทย”
AI MASTER CLASS 2026
ทะลุขีดจำกัด AI ทั่วไป สู่การทำ Automation และบอทช่วยหาเงิน 24 ชม.


เปลี่ยน AI เป็น “เครื่องจักรทำเงิน” อัตโนมัติ
เพิ่มเนื้อหาใหม่ 24 บทเรียนสุดล้ำ! หมดยุคก๊อปแปะทีละโพสต์ เปลี่ยน AI ให้เป็นพนักงานประจำที่ทำงานแทนคุณ 24 ชม. ด้วย Automation เต็มรูปแบบ

ระบบสู้รบอัตโนมัติด้วย n8n
สอนผูกระบบ n8n ให้ทำงานร่วมกับ Facebook, YouTube, Google API และ Dropbox ตั้งเวลาโพสต์งาน แชร์ลงกลุ่มแบบออโต้ 100% เซ็ตครั้งเดียว ปล่อยรันยาวๆ
บอท Shopee ปั่นเงิน
แจกสคริปต์ + วิธีเซ็ตบอท Shopee สุดเทพ ดึงคนคลิกเข้าดูสินค้าได้มหาศาล ระบบนี้แค่รันไว้ โอกาสสร้างยอดขายก็วิ่งเข้ามาหาคุณเอง คืนทุนสบายๆ
สูตรลับสาย Content
เทคนิคปั่นคลิป Sora 2, เสกคลิปคำคมล้านวิว, ดึง Facebook Token แบบไม่ต้องง้อโปรแกรมแพงๆ, และใช้ OpenRouter ประหยัดค่า API
ยุคที่ AI พลิกโลก การทำงาน
สุดยอด ความคุ้มค่า ของคอร์ส
- เรียน AI คุ้มที่สุด! 🎯 ได้คอร์สออนไลน์ที่อัปเดต ฟรีตลอดชีพ (ตอนนี้มี 120+ บทเรียนแล้ว!)
- AI ใช้งานได้จริง! 🚀 โพสต์ออโต้ด้วย n8n / ปั่นวิว Shopee / สร้างภาพ-วิดีโอ / เพิ่มประสิทธิภาพธุรกิจ
- Workshop จับมือทำ (VIP) 👨💻 ใช้ AI เป็นแน่นอน! ทำจริง พร้อมโค้ชดูแลใกล้ชิด
- กลุ่มเล็ก สอนละเอียด! 👥 จำกัดแค่ 8 คนต่อรอบ ได้รับคำแนะนำแบบตัวต่อตัว
- สมัครครั้งเดียว คุ้มตลอดชีพ! 💰 ไม่มีรายเดือน อัปเดตเนื้อหาใหม่ฟรี!
สรุปเนื้อหาอัปเดตใหม่ 24 บทเรียน (System Update 2026)
Module 1: AI Automation (ให้ระบบทำงานแทน)
- ⚡ ใช้ Dropbox สั่ง n8n ทำงาน (ชีวิตดีขึ้นเยอะ)
- ⚡ เชื่อม Google API เข้า n8n แบบจับมือทำ
- ⚡ วิธีโพสต์รูป FB ออโต้ (ไม่ต้องตั้งเวลาเอง)
- ⚡ เซตบอทลง Reels ทิ้งไว้ (…แล้วไปนอน)
- ⚡ ลงคลิป YouTube อัตโนมัติ (ไม่ต้องนั่งรออัปโหลด)
- ⚡ แชร์โพสต์เข้ากลุ่ม FB ทีละหลายกลุ่ม (Auto)
Module 2: Marketing & Shopee Bot (สายปั่นเงิน)
- 💰 วิธีใช้ “บอท Shopee” ปั่นเงิน (ฉบับคนขี้เกียจแต่ได้ตังค์)
- 💰 เทคนิคเขียน Caption ให้คนรอกดซื้อ Shopee
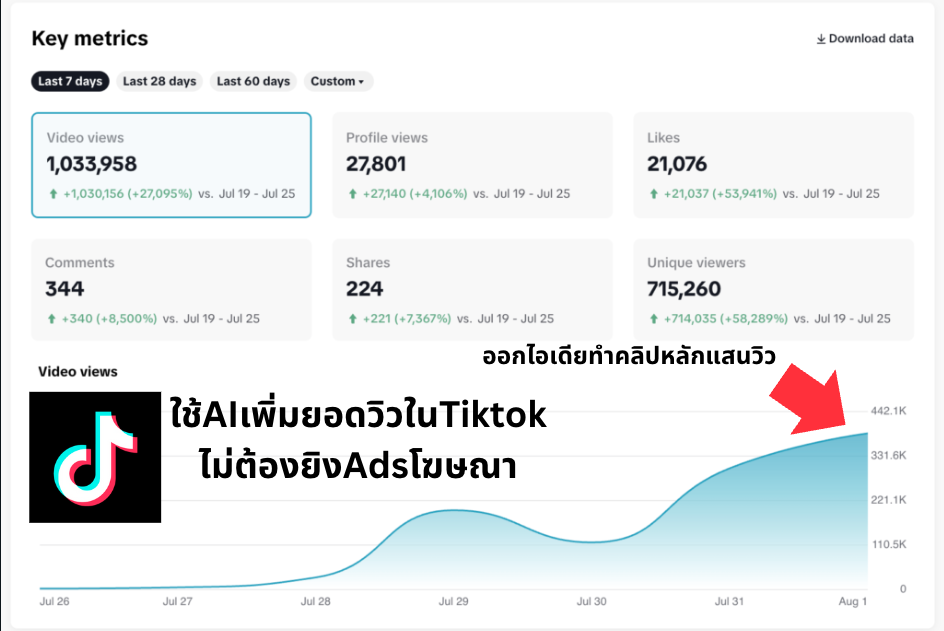
- 💰 เคล็ดลับดันเพจ FB ทะลุล้านวิว (ไม่จ่ายค่าแอด)
- 💰 แอบส่องคู่แข่ง! ดึงข้อมูลมาวิเคราะห์รอยรั่ว
- 💰 พลิกโฉมการตลาด วิธีใช้ Adverra แบบเนียนๆ
- 💰 เขียนแคปชั่นขายของ ก๊อปวางจบใน 1 นาที
Module 3: Content Scaling (สายปั่นคอนเทนต์)
- 🎬 ปั่นคลิปด้วย Sora 2 ออโต้ (ไม่ต้องนั่งทำเอง)
- 🎬 เปลี่ยนบทความเดียว ให้เป็น 99 คลิป ในคลิกเดียว!
- 🎬 เสกคลิปคำคมล้านวิว (แค่คลิกเดียวจบ)
- 🎬 ทำคลิปเล่าเรื่อง ระบบ AI จัดการให้ (ไม่ต้องตัดต่อ)
- 🎬 วิธีปั๊มรูปเก็บไว้ทำ Content Bank (โพสต์ได้ทั้งเดือน)
- 🎬 อัป Podcast ลง YT แบบออโต้ + พร้อมใส่ปก
Module 4: Advanced AI Hacks (ทริคลับสายเทค)
- 🔧 วิธีขอ Facebook Token (ไม่ต้องง้อโปรแกรมแพง)
- 🔧 OpenRouter ตัวเดียวจบ! (ต่อ API กับ AI ได้ทุกตัว)
- 🔧 เปลี่ยน ChatGPT เป็นนักการตลาดระดับโลก
- 🔧 KieAI คืออะไร? (ทำไมสาย AI ยุคนี้ถึงต้องมี)
- 🔧 สร้างค่ายกักกันบอท 24 ชม. ด้วย Make+AI
- 🔧 สูตรลับสาย Mac! รวมวิธีตั้งค่า+ทริคประหยัดเวลา
สารบัญเนื้อหา: Module 1 ปูพื้นฐาน AI
เริ่มต้นจากศูนย์ สู่การประยุกต์ใช้เครื่องมือ AI แห่งยุคดิจิทัล
1. ปูพื้นฐาน AI & เครื่องมือหลัก
- ⚡ AI คืออะไร? จุดเริ่มต้นและวิวัฒนาการ UPDATED
- ⚡ การใช้งาน ChatGPT พื้นฐาน
- ⚡ การใช้ Bing เบื้องต้นเพื่อการค้นหา
- ⚡ การใช้ Gemini/Bard จากฝั่ง Google UPDATED
2. ศาสตร์แห่ง Prompt Engineering
- 🎯 พื้นฐานการ Prompt แบบ 6 ขั้นตอน
- 🎯 อาชีพ Prompt Engineer อนาคตใหม่ HOT!
- 🎯 การใช้งาน Plugin ขยายขีดความสามารถ AI
- 🎯 ใช้ Gemini ช่วยวางแผนการเรียน UPDATED
3. สร้างผู้ช่วยอัจฉริยะ & งานค้นหา
- 💡 My GPTs (Part 1): สร้างผู้ช่วยส่วนตัว NEW
- 💡 My GPTs (Part 2): ให้ AI อ่านและวิเคราะห์ไฟล์ NEW
- 💡 Perplexity 1: มือใหม่ก็ใช้ได้ ค้นหาข้อมูลชัวร์ LATEST
- 💡 Perplexity 2: ถามให้โปร ใช้งานระดับสูง LATEST
4. AI ผลิตสื่อ & อัปเดตล่าสุด
- 🎬 สอนสร้างงานศิลปะภาพด้วย Midjourney
- 🎬 สร้างคลิปวิดีโอจากภาพด้วย KLING AI HOT!
- 🎬 ใช้งาน Meta AI ใหม่ล่าสุดจาก Facebook LATEST
- 🎬 รีวิว ChatGPT อัปเดตปีนี้ มีอะไรน่าใช้บ้าง? LATEST
สารบัญเนื้อหา: Module 2 Workshop (15 โปรเจกต์)
ฝึกปฏิบัติจริงกับโปรเจกต์ธุรกิจและการตลาดแบบครบวงจร เรียนรู้จากการลงมือทำ 100%
1. สายการศึกษา & การตลาด
- ⚡ ธุรกิจสอนภาษาอังกฤษ – ออกแบบหลักสูตร เนื้อหา และการตลาด POPULAR
- ⚡ Workshop การตลาด – ทำการตลาดดิจิทัล วิเคราะห์และสร้างคอนเทนต์ HOT!
- ⚡ เพจสอนคณิตศาสตร์ – สร้างโจทย์ คำอธิบาย และระบบสอนออนไลน์
- ⚡ เพจสอนภาษาอังกฤษ (Advance) – จัดการเนื้อหา โต้ตอบ และแชทบอท
2. ธุรกิจสื่อ & บริการลูกค้า
- 💼 อาหารเสริม & ฟิตเนส – จัดแผนโภชนาการ โปรแกรมฟิตเนส และการขาย
- 💼 Workshop เพจข่าว – รวบรวม วิเคราะห์ และเขียนบทความข่าวออโต้
- 💼 YouTuber ด้วย AI – วางแผน สคริปต์ และเทคนิคเพิ่มยอดวิว NEW
- 💼 Customer Service AI – แชทบอทบริการลูกค้า จัดการคำร้องเรียน NEW
3. เครื่องมือ AI ขั้นสูง & Data
- 🎨 สร้างรูปด้วย DALL·E – ออกแบบโลโก้ แบรนด์ และภาพโฆษณา UPDATED
- 🎨 เจาะลึก Gemini AI – ใช้งานระดับลึก ประยุกต์ใช้กับธุรกิจจริง UPDATED
- 🎨 สร้าง Dashboard (Qwen3) – ทำ Data Visulization แบบ Interactive HOT!
- 🎨 สร้างวีดีโอพร้อมเพลงออโต้ – ใช้ Script ปั่นคลิปหลักร้อยไฟล์บน Mac HOT!
4. Automation & Scripting (Mac)
- ⚙️ เปลี่ยนเสียงวิดีโอหลายไฟล์ – จัดการผ่าน Terminal ไม่ต้องพึ่งโปรแกรมตัดต่อ NEW
- ⚙️ สร้างคลิปสยองขวัญออโต้ – สั่งรวมภาพนิ่งและเสียงด้วยโค้ดคำสั่งง่ายๆ NEW
- ⚙️ Podcast to YouTube – แปลงไฟล์เสียง+ภาพปก ลงช่องแบบอัตโนมัติ NEW
Module 3: การประยุกต์ใช้ (94 บทเรียนประยุกต์)
เทคนิคการนำ AI ไปใช้ในงานจริง ครอบคลุมทุกสายอาชีพ ตั้งแต่เขียนโค้ด ทำภาพ ไปจนถึงการตลาดระดับมืออาชีพ
Module 4: รวม Prompt (1000+ Templates)
คลัง Prompt สำเร็จรูป 23 หมวดหมู่ คัดสรรมาแล้วสำหรับทุกการใช้งาน ก๊อปปี้ไปวางใช้งานได้ทันที 100%
Module 5: รวมคำสั่งสร้างรูป (1000+ Image Prompts)
Prompt สำหรับสร้างภาพ กราฟิก และอาร์ตเวิร์กด้วย AI คุณภาพสูง 100% ครบครันทุกสไตล์พร้อมเทมเพลตที่ใช้งานได้ทันที
Module 6: รวม Ebook (36 เล่ม ดาวน์โหลดฟรี 100%)
คลังหนังสือดิจิทัลครบครันเกี่ยวกับ AI และการนำไปใช้งาน พร้อมเนื้อหาอัปเดตใหม่ล่าสุดใน 8 หมวดหมู่
สิทธิพิเศษ & โปรแกรมของแถม (Bonus Tools)
สุดยอดชุดเครื่องมือ AI ทรงพลังที่เราพัฒนาขึ้นมาเพื่อคุณโดยเฉพาะ ช่วยให้การทำงานง่ายขึ้นและเป็นมืออาชีพ!


เลือกระบบการเรียนที่ เหมาะกับคุณ
สมัครครั้งเดียว อัปเดตฟรีตลอดชีพ ไม่มีเก็บรายเดือน
เหมาะสำหรับผู้ที่ชอบเรียนรู้และลงมือทำด้วยตัวเอง
- เรียนออนไลน์ 120+ บทเรียน (รวมอัปเดตใหม่ 24 ตอนสุดล้ำ)
- ดูซ้ำได้ตลอดชีพ ไม่มีหมดอายุ
- รับสคริปต์บอท Shopee ไปใช้งานได้ทันที
- Workflow n8n โพสต์ออโต้ พร้อมสอนการใช้งาน
- ฟรี! eBook 23 เล่ม พร้อม Prompt แบบก๊อปวาง
- รวมเครื่องมือ AI กว่า 100+ ตัว และ AI สร้างภาพ 20 ตัว
เรียนออนไลน์ + เจอตัวสอนสด (รับแค่ 8 ท่าน)
- ✅ ได้รับสิทธิ์คอร์สออนไลน์ทุกอย่างในแพ็กเกจ 4,990 บาท
- 🌟 เข้าเรียน Workshop สด 4 ชั่วโมงเต็ม
- แชร์ไอเดียและแนะนำแนวทาง การทำ “บอท Shopee ปั่นเงิน” ให้คุณนำไปต่อยอดสร้างรายได้
- แนะนำแนวทางการวางระบบ Automation (n8n) เพื่อนำไปประยุกต์ใช้กับงานของคุณ
- พูดคุยปรึกษาปัญหาธุรกิจ หรือกลยุทธ์ AI (สามารถสอบถามนอกรอบหลังเรียนจบได้)
- ดูแลใกล้ชิดสุดๆ รับกลุ่มเล็กเพียง 8 คนต่อรอบเท่านั้น!
🚨 ด่วน! รอบ Workshop สดใกล้เต็มแล้ว สงวนสิทธิ์ที่นั่งให้ผู้ที่โอนจองก่อนเท่านั้น
📍 สถานที่เรียน: ร้าน Paulsteak house เลี่ยงเมืองปากเกร็ด 46 นนทบุรี