คุณเคยรู้สึกว่าโลกของ AI นั้นกว้างใหญ่และน่าตื่นเต้น แต่ไม่รู้จะเริ่มต้นจากตรงไหนไหม? วันนี้เรามีรวมเครื่องมือ AI กว่า 100 รายการที่จะช่วยให้คุณก้าวสู่โลกแห่งอนาคตได้อย่างมั่นใจ! แบ่งเป็น 10 หมวดหมู่ ครอบคลุมทุกด้านของชีวิตและการทำงาน พร้อมคำแนะนำการใช้งานจากผู้เชี่ยวชาญ มาดูกันว่ามีอะไรบ้าง!
ทำไมต้องใช้เครื่องมือ AI?
- ประหยัดเวลา: AI ช่วยทำงานซ้ำๆ ให้คุณได้อย่างรวดเร็ว
- เพิ่มประสิทธิภาพ: AI ช่วยวิเคราะห์ข้อมูลและให้ข้อมูลเชิงลึกที่มนุษย์อาจมองข้าม
- สร้างสรรค์สิ่งใหม่: AI ช่วยให้คุณสร้างสรรค์งานที่แปลกใหม่และน่าสนใจ
- ลดต้นทุน: หลายเครื่องมือ AI ช่วยลดค่าใช้จ่ายในระยะยาว
- เรียนรู้และพัฒนา: การใช้ AI ช่วยให้คุณเรียนรู้เทคโนโลยีใหม่ๆ อยู่เสมอ
10 หมวดหมู่เครื่องมือ AI ที่คุณต้องรู้!
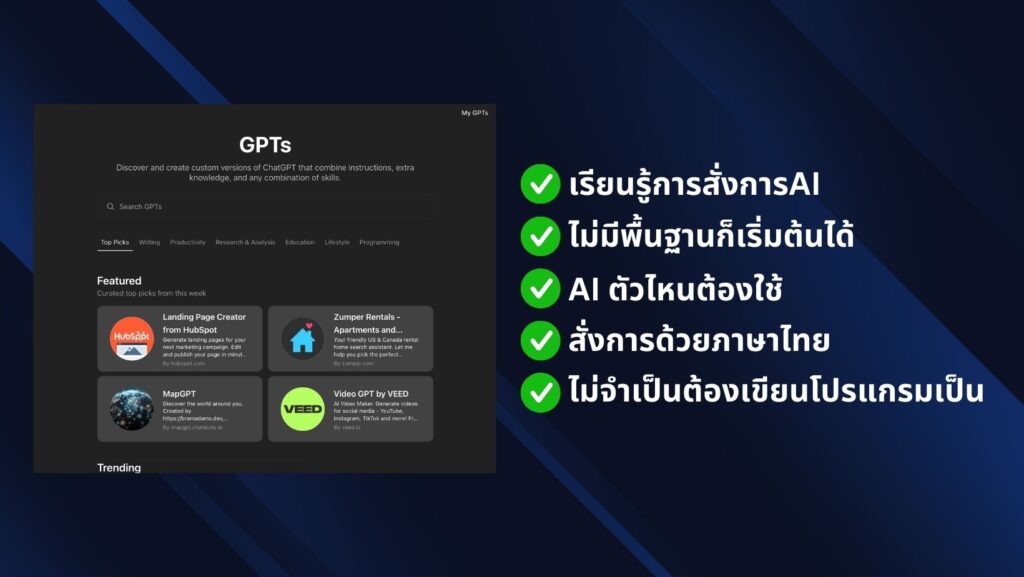
1. การเขียนและสร้างเนื้อหา ✍️
- ChatGPT: AI chatbot สำหรับการสนทนาและสร้างเนื้อหา
คำแนะนำ: ใช้สำหรับระดมความคิด แก้ไขงานเขียน และตอบคำถามทั่วไป - Jasper: เครื่องมือเขียนด้วย AI สำหรับการตลาดและธุรกิจ
คำแนะนำ: เหมาะสำหรับสร้างเนื้อหาการตลาดที่หลากหลาย เช่น บทความ โฆษณา - Grammarly: ตรวจสอบไวยากรณ์และการเขียนด้วย AI
คำแนะนำ: ใช้ตรวจสอบและแก้ไขข้อผิดพลาดในการเขียน ปรับปรุงสไตล์การเขียน
2. การออกแบบและสร้างภาพ 🎨
- DALL-E 2: สร้างภาพจากคำอธิบายด้วย AI
คำแนะนำ: ใช้สร้างภาพที่มีความสร้างสรรค์และแปลกใหม่จากคำอธิบาย - Midjourney: สร้างภาพศิลปะด้วย AI
คำแนะนำ: เหมาะสำหรับสร้างภาพศิลปะที่มีสไตล์เฉพาะตัว - Canva: แพลตฟอร์มออกแบบกราฟิกที่มีฟีเจอร์ AI
คำแนะนำ: ใช้สำหรับออกแบบกราฟิกทั่วไป โปสเตอร์ โซเชียลมีเดีย
3. การแปลงเสียงและการสังเคราะห์เสียง 🎵
- Descript: แพลตฟอร์มตัดต่อวิดีโอและเสียงด้วย AI
คำแนะนำ: ใช้สำหรับตัดต่อวิดีโอและเสียงโดยการแก้ไขสคริปต์ - Murf: สร้างเสียงพากย์ AI คุณภาพสูง
คำแนะนำ: ใช้สร้างเสียงพากย์สำหรับวิดีโอ พอดแคสต์ หรือการนำเสนอ - Synthesia: สร้างวิดีโอด้วย AI avatars
คำแนะนำ: ใช้สร้างวิดีโอนำเสนอโดยใช้ตัวละคร AI
4. การวิเคราะห์ข้อมูลและ Business Intelligence 📊
- IBM Watson: แพลตฟอร์ม AI สำหรับการวิเคราะห์ข้อมูลและ ML
คำแนะนำ: ใช้สำหรับการวิเคราะห์ข้อมูลขั้นสูงและการสร้างโมเดล ML - Tableau: เครื่องมือวิเคราะห์และแสดงผลข้อมูลที่มีฟีเจอร์ AI
คำแนะนำ: ใช้สร้าง dashboard และ visualize ข้อมูลทางธุรกิจ - Power BI: เครื่องมือ Business Intelligence จาก Microsoft
คำแนะนำ: ใช้วิเคราะห์และแสดงผลข้อมูลทางธุรกิจ มีฟีเจอร์ AI ช่วยในการวิเคราะห์

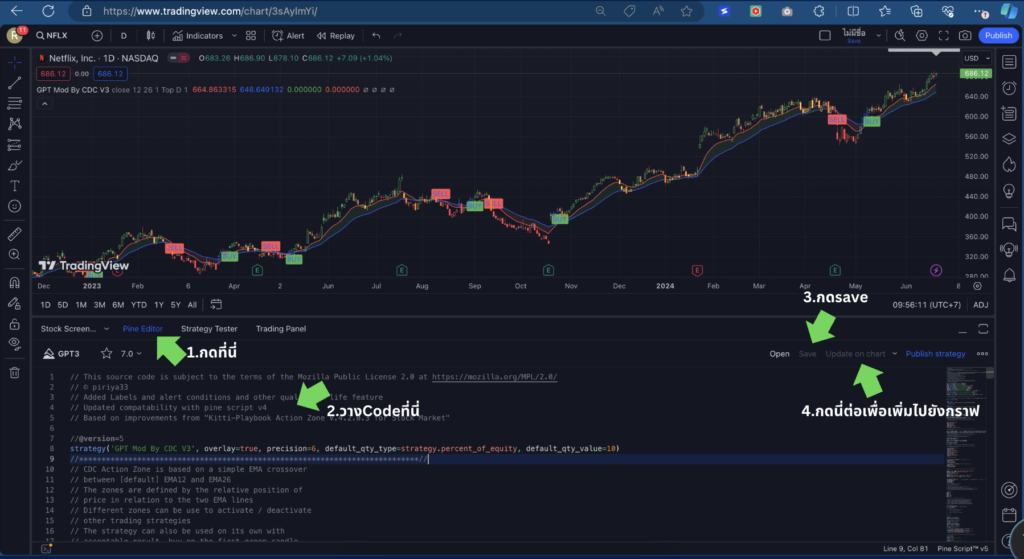
ผมได้ไปเจอคลิปนี้ มีการแจกระบบเทรดของลุงโฉลก ซึ่งเป็น CDC ActionZone ก็เลยเอาไปปรับแต่งเพิ่มนิดๆหน่อยๆ ให้ทำการเปิดสัญญาณซื้อขาย กับเพิ่มสัญลักษณ์การใช้งานให้ง่ายขึ้น

1.เปิดบัญชีทดลอง
ทดลองเทรด Binaryoption (เหมาะก็ต่อเมื่อเปิดดูสัญญาณ TF 1H ขึ้นไป) ฝึกฝนเทรดฟรีคลิกที่นี่
ทดลองเทรดForex (ใช้ได้ดีกับสัญญาณนี้) ฝึกฝนเทรดฟรีคลิกที่นี่
2.ไปที่ https://www.tradingview.com/ แล้วเอาCodeที่ผมแจก ก็อปวางได้เลยครับ
// This source code is subject to the terms of the Mozilla Public License 2.0 at https://mozilla.org/MPL/2.0/
// © piriya33
// Added Labels and alert conditions and other quality of life feature
// Updated compatability with pine script v4
// Based on improvements from "Kitti-Playbook Action Zone V.4.2.0.3 for Stock Market"

//@version=5
strategy('GPT Mod By CDC V3', overlay=true, precision=6, default_qty_type=strategy.percent_of_equity, default_qty_value=10)
//****************************************************************************//
// CDC Action Zone is based on a simple EMA crossover
// between [default] EMA12 and EMA26
// The zones are defined by the relative position of
// price in relation to the two EMA lines
// Different zones can be use to activate / deactivate
// other trading strategies
// The strategy can also be used on its own with
// acceptable result, buy on the first green candle
// and sell on the first red candle
//****************************************************************************//
//****************************************************************************//
// Define User Input Variables

xsrc = input.source(title='Source Data', defval=close)
xprd1 = input.int(title='Fast EMA period', defval=12)
xprd2 = input.int(title='Slow EMA period', defval=26)
xsmooth = input.int(title='Smoothing period (1 = no smoothing)', defval=1)
fillSW = input.bool(title='Paint Bar Colors', defval=true)
fastSW = input.bool(title='Show fast moving average line', defval=true)
slowSW = input.bool(title='Show slow moving average line', defval=true)
labelSwitch = input.bool(title='Turn on assistive text', defval=true)
plotSigsw = input.bool(title='Plot Buy/Sell Signals? ', defval=true)
plotRibsw = input.bool(title='Plot Buy/Sell Ribbon', defval=false)
plotRibbonPos = input.string(title='Ribbon Position', options=['Top', 'Bottom'], defval='Top')

xfixtf = input.bool(title='** Use Fixed time frame Mode (advanced) **', defval=false)
xtf = input.timeframe(title='** Fix chart to which time frame ? **)', defval='D')

plotSig2sw = input.bool(title='Plot momentum based Buy/Sell Signals? ', defval=false)
plotSig2lv = input.int(title='Set signal threshold (higher = stricter)', defval=1, minval=0, maxval=1)

//****************************************************************************//
//Calculate Indicators

f_secureSecurity(_symbol, _res, _src) => request.security(_symbol, _res, _src[1], lookahead = barmerge.lookahead_on) // Using f_secureSecurity to avoid repainting

xPrice = ta.ema(xsrc, xsmooth)


FastMA = xfixtf ?
 ta.ema(f_secureSecurity(syminfo.tickerid, xtf, ta.ema(xsrc, xprd1)), xsmooth)
 :
 ta.ema(xPrice, xprd1)


SlowMA = xfixtf ?
 ta.ema(f_secureSecurity(syminfo.tickerid, xtf, ta.ema(xsrc, xprd2)), xsmooth)
 :
 ta.ema(xPrice, xprd2)

Bull = FastMA > SlowMA
Bear = FastMA < SlowMA

//****************************************************************************//
// Define Color Zones

Green = Bull and xPrice > FastMA  // Buy
Blue = Bear and xPrice > FastMA and xPrice > SlowMA  //Pre Buy 2
LBlue = Bear and xPrice > FastMA and xPrice < SlowMA  //Pre Buy 1

Red = Bear and xPrice < FastMA  // Sell
Orange = Bull and xPrice < FastMA and xPrice < SlowMA  // Pre Sell 2
Yellow = Bull and xPrice < FastMA and xPrice > SlowMA  // Pre Sell 1

//****************************************************************************//
// Display color on chart


bColor = Green ? color.green :
 Blue ? color.blue :
 LBlue ? color.aqua :
 Red ? color.red :
 Orange ? color.orange :
 Yellow ? color.yellow :
 color.black
barcolor(color=fillSW ? bColor : na)

//****************************************************************************//
// Display MA lines

FastL = plot(fastSW ? FastMA : na, 'Fast EMA', color=color.new(color.red, 0), style = xfixtf ? plot.style_stepline : plot.style_line)
SlowL = plot(slowSW ? SlowMA : na, 'Slow EMA', color=color.new(color.blue, 0), style = xfixtf ? plot.style_stepline : plot.style_line)
fillcolor = Bull ? color.new(color.green,90) : Bear ? color.new(color.red,90) : color.new(color.black,90) // fillcolor = Bull ? color.green : Bear ? color.red : color.black
fill(FastL, SlowL, fillcolor) // fill(FastL, SlowL, fillcolor, transp=90)

//****************************************************************************//
// Define Buy and Sell condition
// This is only for thebasic usage of CDC Actionzone (EMA Crossover)
// ie. Buy on first green bar and sell on first red bar

buycond = Green and Green[1] == 0
sellcond = Red and Red[1] == 0

bullish = ta.barssince(buycond) < ta.barssince(sellcond)
bearish = ta.barssince(sellcond) < ta.barssince(buycond)

buy = bearish[1] and buycond
sell = bullish[1] and sellcond

bColor_BullBear = bullish ? color.green : bearish ? color.red : color.black

//****************************************************************************//
// Plot Buy and Sell point on chart

plotshape(plotSigsw ? buy : na,
 style=shape.labelup,
 title='Buy Signal',
 location=location.belowbar,
 color=color.new(color.green, 0),
 text="BUY")
plotshape(plotSigsw ? sell : na,
 style=shape.labeldown,
 title='Sell Signal',
 location=location.abovebar,
 color=color.new(color.red, 0),
 text="SELL")

// Display Buy/Sell Ribbon


plotshape(plotRibsw ? plotRibbonPos == 'Top' ? close : na : na,
 style=shape.square,
 title='Buy/Sell Ribbon',
 location=location.top,
 color=bColor_BullBear)

plotshape(plotRibsw ? plotRibbonPos == 'Bottom' ? close : na : na,
 style=shape.square,
 title='Buy/Sell Ribbon',
 location=location.bottom,
 color=bColor_BullBear)


//****************************************************************************//
// Label

labelstyle = close > SlowMA ? label.style_label_down : label.style_label_up
labelyloc = close > SlowMA ? yloc.abovebar : yloc.belowbar
labeltcolor = buy ? color.black :
 sell ? color.white :
 close > close[1] ? color.green :
 color.red
labelbgcolor = buy ? color.green : sell ? color.red : color.silver
labeltext = buy ? 'BUY next bar\n' : sell ? 'SELL next bar\n' : ' '
trendText = bullish ? 'bullish' : bearish ? 'bearish' : 'sideways'


l1 = label.new(bar_index, na,
 text=labeltext + syminfo.ticker + ' ' + str.tostring(close) + ' ' + syminfo.currency + '\n currently in a ' + trendText + ' trend \n',
 color=labelbgcolor,
 textcolor=labeltcolor,
 yloc=labelyloc,
 style=labelstyle)

label.delete(labelSwitch ? l1[1] : l1)

// Momentum Signal using StochRSI

// Adds a momentum based signal following trends to the script
// Default is hidden, only use with caution
// Parameters for STOCH RSI is hard-coded to avoid cluttering the input screen further
// If you need to change anything, make a copy of the code and change it.
// Inputs are commented out, to enable them comment out the hard coded variables first!

// fixed inputs //

smoothK = 3
smoothD = 3
RSIlen = 14
STOlen = 14
SRsrc = close
OSlevel = 30
OBlevel = 70

// User inputs // // COMMENT ABOVE VARIABLES FIRST!!

// smoothK = input(3,"StochRSI smooth K",type=input.integer,minval=1)
// smoothD = input(3,"StochRSI smooth D",type=input.integer,minval=1)
// RSIlen = input(14,"RSI length",type=input.integer,minval=1)
// STOlen = input(14,"Stochastic length",type=input.integer,minval=1)
// SRsrc = input(close,"Source for StochasticRSI",type=input.source)
// OSlevel = input(30,"Oversold Threshold",type=input.float,minval=0.00)
// OBlevel = input(70,"Oversold Threshold",type=input.float,minval=0.00)

// calculations //
rsi1 = ta.rsi(SRsrc, RSIlen)
k = ta.sma(ta.stoch(rsi1, rsi1, rsi1, STOlen), smoothK)
d = ta.sma(k, smoothD)

// storsiBuySig =  if bullish
//     if (d < OSlevel and crossover(k,d))
//         3
//     else if crossover(k,OSlevel)
//         2
//     else if d > OSlevel and crossover(k,d)
//         1
//     else
//         0
// else
//     0

crossover_1 = ta.crossover(k, d)
crossover_2 = ta.crossover(k, d)
iff_1 = d > OSlevel and crossover_2 ?
 1 : 0
iff_2 = d < OSlevel and crossover_1 ?
 2 : iff_1
storsiBuySig = bullish ? iff_2 : 0

crossunder_1 = ta.crossunder(k, d)
crossunder_2 = ta.crossunder(k, d)
iff_3 = d < OBlevel and crossunder_2 ?
 1 : 0
iff_4 = d > OBlevel and crossunder_1 ?
 2 : iff_3
storsiSellSig = bearish ? iff_4 : 0

plotshape(plotSig2sw ? storsiBuySig > plotSig2lv ? storsiBuySig : na : na,
 'Buy more signals', style=shape.triangleup,
  location=location.belowbar, color=color.new(color.teal, 0))
plotshape(plotSig2sw ? storsiSellSig > plotSig2lv ? storsiSellSig : na : na,
 'Sell more signals', style=shape.triangledown,
  location=location.abovebar, color=color.new(color.orange, 0))


//****************************************************************************//
// Alert conditions

alertcondition(buy,
 title='*Buy Alert',
 message='Buy {{exchange}}:{{ticker}}')

alertcondition(sell,
 title='*Sell Alert',
 message='Sell {{exchange}}:{{ticker}}')

alertcondition(bullish,
 title='is Bullish')

alertcondition(bearish,
 title='is Bearish')

alertcondition(Green,
 title='is Green')

alertcondition(Blue,
 title='is Blue (Strong Rally)')

alertcondition(LBlue,
 title='is Light Blue (Rally)')

alertcondition(Red,
 title='is Red')

alertcondition(Orange,
 title='is Orange (Strong Dip)')

alertcondition(Yellow,
 title='is Yellow (Dip)')


//****************************************************************************//

// Entry and Exit Strategy
if (buy)
    strategy.entry("Buy", strategy.long)

if (sell)
strategy.close("Buy")5. การพัฒนาซอฟต์แวร์และการเขียนโค้ด 💻
- GitHub Copilot: ผู้ช่วยเขียนโค้ดที่ใช้ AI
คำแนะนำ: ใช้เพื่อช่วยในการเขียนโค้ด การแนะนำฟังก์ชัน และการแก้ไขบั๊ก - Tabnine: เครื่องมือ code completion ที่ใช้ AI
คำแนะนำ: ใช้เพื่อช่วยในการเขียนโค้ดให้เร็วขึ้นด้วยการแนะนำโค้ด - Kite: ผู้ช่วยเขียนโค้ดอัจฉริยะสำหรับ Python
คำแนะนำ: ใช้เพื่อเพิ่มประสิทธิภาพในการเขียนโค้ด Python ด้วยการแนะนำและอธิบายฟังก์ชัน
6. การตลาดและโฆษณา 📣
- Albert.ai: แพลตฟอร์มการตลาดดิจิทัลที่ขับเคลื่อนด้วย AI
คำแนะนำ: ใช้สำหรับวางแผนและดำเนินการแคมเปญโฆษณาดิจิทัลอัตโนมัติ - Persado: เครื่องมือสร้างข้อความทางการตลาดด้วย AI
คำแนะนำ: ใช้เพื่อสร้างข้อความโฆษณาที่มีประสิทธิภาพสูงสุด - MarketMuse: เครื่องมือวางแผนเนื้อหาและ SEO ด้วย AI
คำแนะนำ: ใช้เพื่อวิเคราะห์และวางแผนเนื้อหาที่ตรงกับความต้องการของ SEO
7. การบริการลูกค้าและ Chatbots 🤖
- Intercom: แพลตฟอร์มบริการลูกค้าที่มี AI chatbot
คำแนะนำ: ใช้เพื่อจัดการการสนทนากับลูกค้าและให้บริการอัตโนมัติ - Zendesk Answer Bot: ระบบตอบคำถามอัตโนมัติสำหรับการบริการลูกค้า
คำแนะนำ: ใช้เพื่อตอบคำถามที่พบบ่อยและลดภาระของทีมสนับสนุน - Dialogflow: แพลตฟอร์มสร้าง chatbot และระบบประมวลผลภาษาธรรมชาติ
คำแนะนำ: ใช้เพื่อสร้าง chatbot ที่เข้าใจภาษามนุษย์ได้อย่างซับซ้อน
8. การจัดการและการเพิ่มประสิทธิภาพในการทำงาน 📅
- Asana (with AI features): เครื่องมือจัดการโครงการที่มีฟีเจอร์ AI
คำแนะนำ: ใช้เพื่อจัดการงานและโครงการ โดยใช้ AI ช่วยในการจัดลำดับความสำคัญ - Notion AI: เครื่องมือจดบันทึกและจัดการความรู้ที่มี AI ช่วยในการสร้างเนื้อหา
คำแนะนำ: ใช้เพื่อสร้างและจัดการเอกสาร โดยใช้ AI ช่วยในการเขียนและสรุป - Otter.ai: เครื่องมือถอดเสียงการประชุมเป็นข้อความด้วย AI
คำแนะนำ: ใช้เพื่อบันทึกและถอดเสียงการประชุมเป็นข้อความอัตโนมัติ
9. การเงินและการลงทุน 💰
- Alpaca: แพลตฟอร์มการเทรดหุ้นอัตโนมัติด้วย AI
คำแนะนำ: ใช้สำหรับสร้างและทดสอบกลยุทธ์การเทรดอัตโนมัติ - Betterment: ที่ปรึกษาการลงทุนอัตโนมัติด้วย AI
คำแนะนำ: ใช้สำหรับการจัดการพอร์ตการลงทุนแบบอัตโนมัติ - Kensho: แพลตฟอร์มวิเคราะห์ข้อมูลทางการเงินด้วย AI
คำแนะนำ: ใช้สำหรับวิเคราะห์ข้อมูลตลาดการเงินและเศรษฐกิจ
10. การศึกษาและการเรียนรู้ 📚
- Duolingo: แอพเรียนภาษาที่ใช้ AI ในการปรับแต่งการเรียนรู้
คำแนะนำ: ใช้สำหรับการเรียนภาษาต่างประเทศด้วยวิธีที่สนุกและมีประสิทธิภาพ - Century: แพลตฟอร์มการเรียนรู้ที่ใช้ AI ปรับแต่งเนื้อหาให้เหมาะกับผู้เรียน
คำแนะนำ: ใช - Century: แพลตฟอร์มการเรียนรู้ที่ใช้ AI ปรับแต่งเนื้อหาให้เหมาะกับผู้เรียน
คำแนะนำ: ใช้สำหรับสถาบันการศึกษาในการสร้างแผนการเรียนรู้ที่เป็นส่วนตัว - Quizlet: แพลตฟอร์มการเรียนรู้ที่ใช้ AI ช่วยในการสร้างแบบทดสอบ
คำแนะนำ: ใช้สำหรับการสร้างและฝึกฝนด้วยบัตรคำและแบบทดสอบอัจฉริยะ - ELSA Speak: แอพฝึกการออกเสียงภาษาอังกฤษด้วย AI
คำแนะนำ: ใช้สำหรับการปรับปรุงการออกเสียงภาษาอังกฤษด้วยการวิเคราะห์และให้ feedback แบบเรียลไทม์

AI Master Class
(ใช้AIช่วยทำธุรกิจ การตลาด เพิ่มประสิทธิภาพ)


ขอขอบคุณที่ไว้วางใจ


เราอยู่ในยุคที่ AI กำลังจะมาพลิกโลกการทำงาน


คอร์สนี้เหมาะสำหรับ
![]() ผู้ประกอบการ เจ้าของธุรกิจ ที่อยากนำ AI มาช่วยเพิ่มผลกำไร เพิ่มยอดขาย
ผู้ประกอบการ เจ้าของธุรกิจ ที่อยากนำ AI มาช่วยเพิ่มผลกำไร เพิ่มยอดขาย![]() มนุษย์เงินเดือน ที่ต้องการอัพสกิลตัวเอง เพื่อเพิ่มโอกาสในอาชีพการงาน
มนุษย์เงินเดือน ที่ต้องการอัพสกิลตัวเอง เพื่อเพิ่มโอกาสในอาชีพการงาน![]() ผู้ที่สนใจเทคโนโลยี AI และต้องการนำไปประยุกต์ใช้ในชีวิตประจำวัน
ผู้ที่สนใจเทคโนโลยี AI และต้องการนำไปประยุกต์ใช้ในชีวิตประจำวัน![]() นักลงทุน ที่ต้องการให้ AI ช่วยตัดสินใจในการลงทุน
นักลงทุน ที่ต้องการให้ AI ช่วยตัดสินใจในการลงทุน
สิ่งที่คุณจะได้เรียนรู้ในคอร์ส
![]() ปูพื้นฐาน AI และ ChatGPT จากระดับเริ่มต้นจนใช้งานเป็น
ปูพื้นฐาน AI และ ChatGPT จากระดับเริ่มต้นจนใช้งานเป็น![]() เทคนิคการ Prompt ให้ AI ทำงานตามที่เราต้องการ
เทคนิคการ Prompt ให้ AI ทำงานตามที่เราต้องการ![]() ประยุกต์ใช้ AI ในด้านต่างๆ เช่น การตลาด, Content Creation, SEO
ประยุกต์ใช้ AI ในด้านต่างๆ เช่น การตลาด, Content Creation, SEO![]() สร้างรูปภาพ วิดีโอ ด้วย AI อย่าง DALL-E
สร้างรูปภาพ วิดีโอ ด้วย AI อย่าง DALL-E![]() เรียนรู้การใช้ AI ช่วยเหลือในการลงทุน
เรียนรู้การใช้ AI ช่วยเหลือในการลงทุน![]() AI อีกมากมายที่จะช่วยให้ชีวิดและธุรกิจของคุณง่ายขึ้น
AI อีกมากมายที่จะช่วยให้ชีวิดและธุรกิจของคุณง่ายขึ้น
🔥 สุดยอดความคุ้มของคอร์ส 🔥
✅ เรียน AI คุ้มที่สุด! 🎯 ได้คอร์สออนไลน์ที่อัปเดต ฟรีตลอดชีพ (ตอนนี้มี 100+ บทเรียนแล้ว!)
✅ Workshop จับมือทำ 1 ครั้ง 👨🏫 ใช้ AI เป็นแน่นอน! ทำจริง พร้อมโค้ชดูแลใกล้ชิด
✅ กลุ่มเล็ก สอนละเอียด! 👥 จำกัดแค่ 8 คนต่อรอบ ได้รับคำแนะนำแบบตัวต่อตัว
✅ AI ใช้งานได้จริง! 🚀 ทำคอนเทนต์ไวขึ้น / ทำ SEO / สร้างภาพ-วิดีโอ / เพิ่มประสิทธิภาพธุรกิจ
✅ สมัครครั้งเดียว คุ้มตลอดชีพ! 💰 ไม่มีรายเดือน อัปเดตเนื้อหาใหม่ฟรี!


และยังมีการประยุกต์ใช้อื่นๆอีกมากมาย
![]() ใช้ Gemini วางแผนการเรียน พร้อมตัวอย่างการใช้งาน
ใช้ Gemini วางแผนการเรียน พร้อมตัวอย่างการใช้งาน
📝 Workshop เพจสอนพิเศษคณิตศาสตร์
💬 workshop เพจ ธุรกิจสอนภาษาอังกฤษ
📝 ลองให้ ChatGPT สอนเขียน HTML CSS สอนดีไม่พอสรุปได้ดีด้วย
🚀 สอนสร้างหน้าเวปใน5นาที ด้วย ChatGPT ไม่ต้องเขียนCodeเองแม้แต่ตัวเดียว
🎥 AI สรุปคลิป youtube
💡 ใช้ ChatGPT ออกไอเดียทำคลิปวีดีโอ
🗺️ ChatGPT เขียน Mind Mapping ได้ด้วย
🔍 ใช้ Chat GPT ช่วยหารูปได้ด้วย
📚 ล้ำจัด ให้ AI แต่งนิทาน พร้อมภาพประกอบ คอมโบ ChatGPT+Midjourney+Canva
🖌️ ทำรูปสมุดระบายสี ด้วย Midjourney
📈 ใช้ ChatGPT เขียน SEO ตั้งแต่เริ่ม
📊 50 marketing Prompt
🖼️ สร้างรูปฟรีๆผ่าน ChatGPT
🖥️ ใช้ ChatGPT สร้างslide แบบ powerpoint
📺 สร้างคำอธิบายคลิป Youtube เพิ่ม SEO
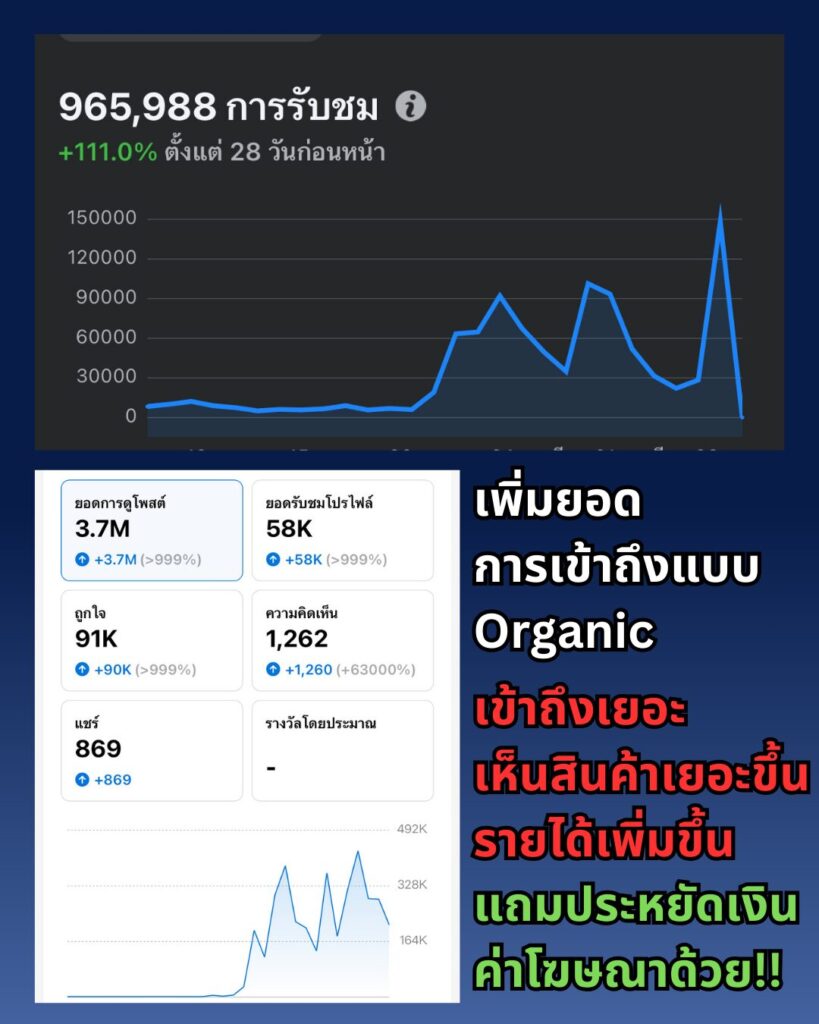
ไอเดียทำคลิปไม่มีตัน
ช่วยเราทำคลิป tiktok ยอดวิวพุ่งๆ ไม่ต้องยิงAds